I remember being fascinated as a youngster with the notion of squeezing lots of things of one sort into a single thing of a different sort — just for the sport of seeing if it could be done. You would hear stories every now and then about crazy things like a couple dozen college students cramming themselves into a Volkswagon Beetle or nearly as many finding a way to shoehorn themselves into a telephone booth. I recall one particular time as a teenager when I acted on this fascination and, on somewhat of a whim, rallied a bunch of friends who were willing to get really, really cozy with one another inside my Mom’s Karmann Ghia.
Now, I will readily forgive any readers who don’t quite remember what a Karmann Ghia was, given that a common reaction from people back then on seeing it for the first time was to twist their faces into question marks and ask matter of factly, “What in the world’s that?” Well, the Karmann Ghia was one of Volkswagon’s earliest entries into the sportscar market. It was low to the ground, had two doors, bucket seats in the front, a jump seat in the back, a rear-mounted, air-cooled, four cylinder engine that made the characteristic, old-school VW sound, and a tiny little trunk mounted up front right on top of the gas tank. Its styling was not a lot unlike a VW Beetle that has been flattened out, elongated, and widened a bit. In other words, it looked more or less like a squashed Bug. Gardeners might even picture a squash bug. Anyone who has ever been inside one will tell you it has all the roominess and comfort of a bell pepper. Or maybe a banana pepper is more like it.
So, back to the story of my friends and my Mom’s Karmann Ghia. I have no idea why this happened, but I can remember where it happened, what sparked the idea, and how many people were involved. A few of us were at one of our customary teenage hangouts, the local Dairy Queen, sitting in a booth drinking sodas or eating Dilly Bars or whatever teenagers did back then when they had almost no money and about as much sense. Every so often another cluster of friends would show up, some of whom would squeeze into the booth with us. And then another. And another. Somewhere along the line, someone got this idea in their head and then teenage groupthink kicked into full gear.
Speaking of gears, working the gear shift was the hardest part about driving with 13 people inside. Yes, it had a four-speed stick shift on the floor. And it had 13 teenagers inside it. And I drove it around the block, brought it back, and parked it safely back in the Dairy Queen parking lot. A friend who had remained outside the car helped open the passenger door, as some random part of someone’s anatomy was smashed solidly into the inside handle, rendering it momentarily inoperable.
There is no point to the story, just as there was no point to the stunt. However, it just might help to explain why to this day, some forty or so years later, I find myself fascinated with seeing just how many veggies I can coax into such a little tiny garden. A more germane question is probably, “How much produce can I extract from such a little tiny space?”
The answer to this question lies in how well I can practice the principles and techniques associated with the general concept known as “intensive gardening.” There are numerous techniques which vary in the details, but they all work in some way to maximize the use of limited garden space. Some of the techniques are complementary, allowing them to be practiced together for an even more intense effect; others are more standalone undertakings. A trait they all share is that they work best if applied in harmony with a plant’s natural tendencies and preferences, rather than against them. In the following paragraphs, I will briefly introduce the techniques that I use.
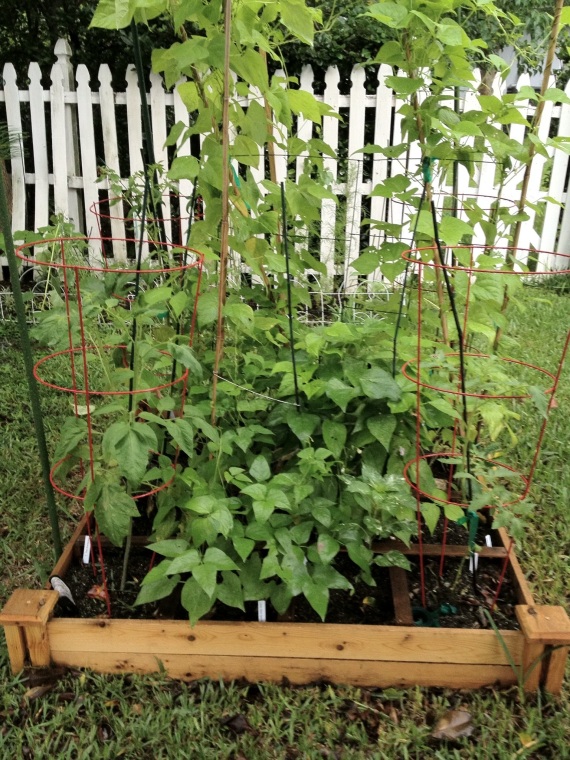
Square Foot Gardening (SFG) – This is a technique developed and perfected by Mel Batholomew over the course of about twenty-five years. While the name of this technique has an intuitive simplicity, there’s actually a lot more to it than meets the eye. Its most essential element is the use of a specific soil recipe called “Mel’s Mix.” It also features the use of raised beds with permanent grids to partition the gardening space into clearly defined square foot sections, hence the name. I currently have a single 4×4 raised bed dedicated to SFG, giving me room for as many as 16 different crops at any given time. I only set this up a few weeks ago, but I am very pleased with the results so far. The picture at the top of this page shows what this garden looks like today. The picture below shows the same garden five weeks ago, right after I planted it. The tallest tomato plant today is a 42 inch Brandywine that I started from seed a mere ten weeks ago. The tallest of the beans has already outgrown an eight-foot pole. Need I say more about why I’m pleased with the early results of SFG? If you are interested in this technique, I highly recommend Mel’s book, which can be found at this link: All New Square Foot Gardening

Quasi-square foot gardening – This is the term I apply to raised beds that have been partially converted to SFG, but which for some reason or another do not qualify as being true SFG beds. I have two such beds. One is a 4×4 raised bed currently lacking in two essential SFG elements: the soil is not Mel’s Mix, and it does not have any kind of weed barrier between its soil and the soil beneath it. I have added a grid to it, though, and I use SFG spacing for the plants that go in it. Unfortunately, I don’t have anything that I planted in both beds at the same time, which is what I would need to do a side-by-side comparison, so it will be hard to get an objective assessment of the two beds’ performance. At a more subjective level, it does seem the SFG bed is doing better overall; only the bell pepper appears to be faring better in the quasi-SFG bed than in the true SFG bed. At some point I will decide if it is worth the effort to change out the soil and install a weed barrier. The picture below, taken a few weeks ago, shows this bed in the foreground.

The second quasi-SFG bed is a 6×3 bed primarily intended as a blueberry bed. In the picture above, it is the farthest one in the background, over by the fence. Since I’ve already planted the bueberries, which happen to be perennials, I don’t expect to change the soil anytime soon. For those who may not know, blueberries are acid-loving plants. For this reason, I have been working for the past year to get the pH level down to the level that blueberries prefer. Despite the size of the bed (18 square feet), it is ideally sized for only two blueberry bushes, so that’s what I have in there. For now, though, the blueberries are not yet full-grown, so I decided to install a grid and use some of the unused space for general gardening in the meantime. For this season, I figured I have 14 square feet available for general gardening. That space should decline over time as the blueberries mature.
I am learning by trial and error which plants like those soil conditions and which don’t, and the results have been a bit puzzling. Peppers, for instance, are supposed to do well in an acidic soil. So far, this appears to be the case for the California Wonder Sweet pepper, but it seems to be utterly toxic to the Fish pepper. I was so surprised by the rapid demise of the first Fish pepper that I replaced it with two more. Those were both gone in about three days. It was almost stunning to watch. The first day they were fine, by the second day they had dropped all their leaves, and by the end of the day three their stems had withered. At that, I licked my wounds, said “go figure,” and moved on.
Simple raised bed gardening — the last of my raised beds, another 4×4, has the same type of soil as the first quasi-SFG bed mentioned above, but it has no grid. At the time I learned about SFG, this bed already had some plants for this season, and their alignment was such that a grid was not feasible without tearing something up, so for now, this one is staying as a simple raised bed. Even so, it gets an honorable mention for intensive gardening, in that all the available surface is used for gardening, unlike traditional row gardening, in which the majority of space is used for aisles — also known as space to walk, till, hoe, and pull weeds. With a raised bed, whether SFG or not, all the cultivating and tending can be done while standing or kneeling around the perimeter. At most, I have to stretch my arm two feet to reach from edge to center.
Wide row planting — this is an adaptation of traditional row gardening and is done directly in the ground. It differs in that, instead of a single, thin row of plants between the aisles, I plant extra-wide rows, such as triple rows, quad rows, or blocks. See my previous blog post on The Cowpea Project for more details. At ground level, plants are spaced exactly like SFG, but the aisles are still left open between rows to allow people to move about between the patches where the veggies are planted. I use this mostly for crops that do better in poor or marginal soil, such as beans or cowpeas. This not only places these plants where they do best, it uses that space more efficiently, and it frees up some of the higher quality soil for crops that need it.
Vertical gardening — this term applies to a wide assortment of ways to use structures and other supports to enable plants to climb or be fastened in some manner to get them up off the ground. Available structures include poles, trellises, cages, and netting, to name but a few. Fasteners come in at least as many choices, ranging from simple twine to reusable Velcro strips.
Vertical gardening is part art, part science. The art part has to do with selecting structures that are aesthetically pleasing and arranging them in such a manner that you will find enjoyment in the way the structure looks while the plants are small, and you will still like the effect as the plants grow to cover the structure. The science part has to do with learning the different climbing habits of the plants in your garden, understanding the limits of the weight and sideways forces both the plants and the structures can withstand. How, for instance, will your cantaloupes fare if the melons are three feet off the ground and a 40 mph gust hits them broadside about a week before harvest? There is also a science to understanding how the vertical crops will affect such things as the ability for air to circulate near the ground so you can avoid mold and mildew, and the extent to which taller plant-covered structures will block the sun in nearby squares, especially at different times of the year.
I’m still very much in the experimental stage with respect to vertical gardening techniques, and am always on the lookout for ways to improve. For this season, I am using a variety of temporary structures, mostly poles for the beans, poles and cages for the tomatoes, and wire trellises for everything else. I may consider installing something more permanent in the future.
Succession planting — In warm climates such as Central Florida, it is possible to grow several crops in any given spot through the course of a year. In its simplest form, the same spot could support multiple plantings of the same crop, say a crop of beans in the spring and another crop of beans in the fall. However, this approach will tend to deplete the nutrients needed by that particular crop, resulting in a progressively lower harvest each season, or the need to mix in chemical fertilizers to replenish the nutrients. The key to maximizing the productivity of the garden overall lies in practicing good crop rotation in order to maintain a natural balance to the soil.
It would be quite easy to turn this concept into a science project if you factor in such things as the optimal rotation sequences, staggered planting dates, ideal planting seasons for different crops, and the differing lengths of the growing season for each kind of plant. I use a much simpler approach and let randomness work to my advantage. When I’m ready to plant something, I look for an available spot and just use what’s available. By planting a wide variety of plants and by not purposefully replanting the same thing over and over again in the same place, simple randomness will keep the crops moving around over time so that the soil gets replenished naturally. A little booster shot of compost between plantings helps, too.
Companion planting — although this term normally applies to plants that do well alongside each other, it can also be used to describe the concept of planting two or more crops in the same space. The earliest known practitioners of this technique are the eastern tribes of North America prior to European settlement. A common practice in those days was planting of the “three sisters” — corn, beans, and squash. Throughout Appalachia, it is still fairly common to plant beans and corn in the same field. In fact, you won’t such a thing as an heirloom pole bean in Appalachia; you will find heirloom “cornfield beans.” On a suburban scale, when combined with SFG and its cousins, the term applies to plants that are planted within the same square. This technique is most effective when planting tall plants and short plants together, such as tomato and marigold, okra and marigold, or tomato and basil, to name but a few.
Edible landscaping — this last technique is essentially the gardening equivalent to coloring outside the lines. Let’s face it: most vegetable gardens are not pretty. Sure, they can be made somewhat attractive by keeping them well tended, and some of the flowers can be pretty, especially against the backdrop of green foliage. But still, veggies can be downright gangly looking at times, and pruning for aesthetics can work against the very reason for growing a vegetable garden in the first place — to grow food. But just because some veggies aren’t pretty, that doesn’t mean all veggies need to be hidden away in the backyard somewhere out of sight of the homeowner association’s Lovely Landscape Vigilantes.
Some vegetables actually make very nice ornamental plants and can be integrated into the landscaping without having to commit unnatural acts on the plant. One example that comes to mind is the Fish pepper, as discussed above and shown below. As you can see, it has very attractive, full, variegated foliage. Some have more white than this one, while others have less. It produces a prolific yield of peppers of various colors, including red, green, yellow, white, and occasionally some black and purple thrown into the mix. The specimen in the picture below is actually planted in the SFG bed. However, now that I have seen it, I can visualize how it will look and where I can integrate future Fish peppers into the landscape. I’m also experimenting with other plants that I think will look good as landscaping specimens. The one I’m most excited about is the Hungarian Black pepper. Not only does that pepper have pretty foliage and bold, attractive, red and black peppers, the blossoms are a gorgeous deep purple. Such a plant should make any landscaper proud.

Now, some might argue that claiming edible landscaping as an intensive gardening technique is akin to claiming credit for a 14th or 15th passenger riding on the bumper. In response, I would remind them that the car stunt had no point, whereas my use of intensive gardening does have a point, and that is to maximize the use of available gardening space in a suburban setting. Thus, every time I move a plant out of the backyard boxes and into the front yard landscape, I free up room for more of the veggies with all the gangliness and attractiveness of, well, a teenage kid driving his Mom’s Karmann Ghia.


